# 系统环境
- 操作系统:Ubuntu Server 20.04 LTS 64bit
- Gitea版本:1.6.1
# 安装
在此使用的是二进制安装,也可使用官方文档中的其他安装方式
所有下载均包括 SQLite, MySQL 和 PostgreSQL 的支持,同时所有资源均已嵌入到可执行程序中,这一点和老版本有所不同。 基于二进制的安装非常简单,只要从 下载页面 选择对应平台,拷贝下载URL,执行以下命令即可
# 用 wget 下载 gitea 到 /usr/local/bin/ 目录下
sudo wget -O /usr/local/bin/gitea https://dl.gitea.io/gitea/1.16.1/gitea-1.16.1-linux-amd64

# 进入 /usr/local/bin 文件夹
cd /usr/local/bin

# 添加 gitea 可执行权限
sudo chmod +x gitea
1
2
3
4
5
6
7
8
2
3
4
5
6
7
8
# 测试
安装完成后,你将会获得 gitea 的二进制文件,在你复制到部署的机器之前可以先测试一下。
命令行执行完后,按住 Ctrl + C 可关掉程序
./gitea web
1
# 以 Service 方式运行
执行以下命令:
sudo vim /etc/systemd/system/gitea.service
1
接着拷贝示例代码 gitea.service 并取消对任何需要运行在主机上的服务部分的注释,譬如 MySQL。
我这儿使用的是 Postgresql,所以打开了 postgresql.service 的注释
Postgresql 安装教程请看:Postgresql 安装文档
[Unit]
Description=Gitea (Git with a cup of tea)
After=syslog.target
After=network.target
###
# Don't forget to add the database service dependencies
###
#
#Wants=mysql.service
#After=mysql.service
#
#Wants=mariadb.service
#After=mariadb.service
#
Wants=postgresql.service
After=postgresql.service
#
#Wants=memcached.service
#After=memcached.service
#
#Wants=redis.service
#After=redis.service
#
###
# If using socket activation for main http/s
###
#
#After=gitea.main.socket
#Requires=gitea.main.socket
#
###
# (You can also provide gitea an http fallback and/or ssh socket too)
#
# An example of /etc/systemd/system/gitea.main.socket
###
##
## [Unit]
## Description=Gitea Web Socket
## PartOf=gitea.service
##
## [Socket]
## Service=gitea.service
## ListenStream=<some_port>
## NoDelay=true
##
## [Install]
## WantedBy=sockets.target
##
###

[Service]
# Modify these two values and uncomment them if you have
# repos with lots of files and get an HTTP error 500 because
# of that
###
#LimitMEMLOCK=infinity
#LimitNOFILE=65535
RestartSec=2s
Type=simple
User=git
Group=git
WorkingDirectory=/var/lib/gitea/
# If using Unix socket: tells systemd to create the /run/gitea folder, which will contain the gitea.sock file
# (manually creating /run/gitea doesn't work, because it would not persist across reboots)
#RuntimeDirectory=gitea
ExecStart=/usr/local/bin/gitea web --config /etc/gitea/app.ini
Restart=always
Environment=USER=git HOME=/home/git GITEA_WORK_DIR=/var/lib/gitea
# If you install Git to directory prefix other than default PATH (which happens
# for example if you install other versions of Git side-to-side with
# distribution version), uncomment below line and add that prefix to PATH
# Don't forget to place git-lfs binary on the PATH below if you want to enable
# Git LFS support
#Environment=PATH=/path/to/git/bin:/bin:/sbin:/usr/bin:/usr/sbin
# If you want to bind Gitea to a port below 1024, uncomment
# the two values below, or use socket activation to pass Gitea its ports as above
###
#CapabilityBoundingSet=CAP_NET_BIND_SERVICE
#AmbientCapabilities=CAP_NET_BIND_SERVICE
###

[Install]
WantedBy=multi-user.target
1
2
3
4
5
6
7
8
9
10
11
12
13
14
15
16
17
18
19
20
21
22
23
24
25
26
27
28
29
30
31
32
33
34
35
36
37
38
39
40
41
42
43
44
45
46
47
48
49
50
51
52
53
54
55
56
57
58
59
60
61
62
63
64
65
66
67
68
69
70
71
72
73
74
75
76
77
78
79
80
81
82
83
2
3
4
5
6
7
8
9
10
11
12
13
14
15
16
17
18
19
20
21
22
23
24
25
26
27
28
29
30
31
32
33
34
35
36
37
38
39
40
41
42
43
44
45
46
47
48
49
50
51
52
53
54
55
56
57
58
59
60
61
62
63
64
65
66
67
68
69
70
71
72
73
74
75
76
77
78
79
80
81
82
83
修改 user,home 目录以及其他必须初始化参数,如果使用自定义端口,则需修改 PORT 参数,反之如果使用默认端口则需删除 -p 标记。
激活 gitea 并将它作为系统自启动服务(设置开机启动):
# 启动 gitea 服务
sudo systemctl enable gitea
# 运行结果
Created symlink /etc/systemd/system/multi-user.target.wants/gitea.service → /etc/systemd/system/gitea.service.
1
2
3
4
2
3
4
# 重载 daemon
重载daemon,让新的服务文件生效:
sudo systemctl daemon-reload
1
# 开启服务
# 打开 gitea 服务
sudo systemctl start gitea
1
2
2
# 关闭服务
# 关闭 gitea 服务
sudo systemctl stop gitea
1
2
2
# 查看状态
sudo systemctl status gitea
1
注意:
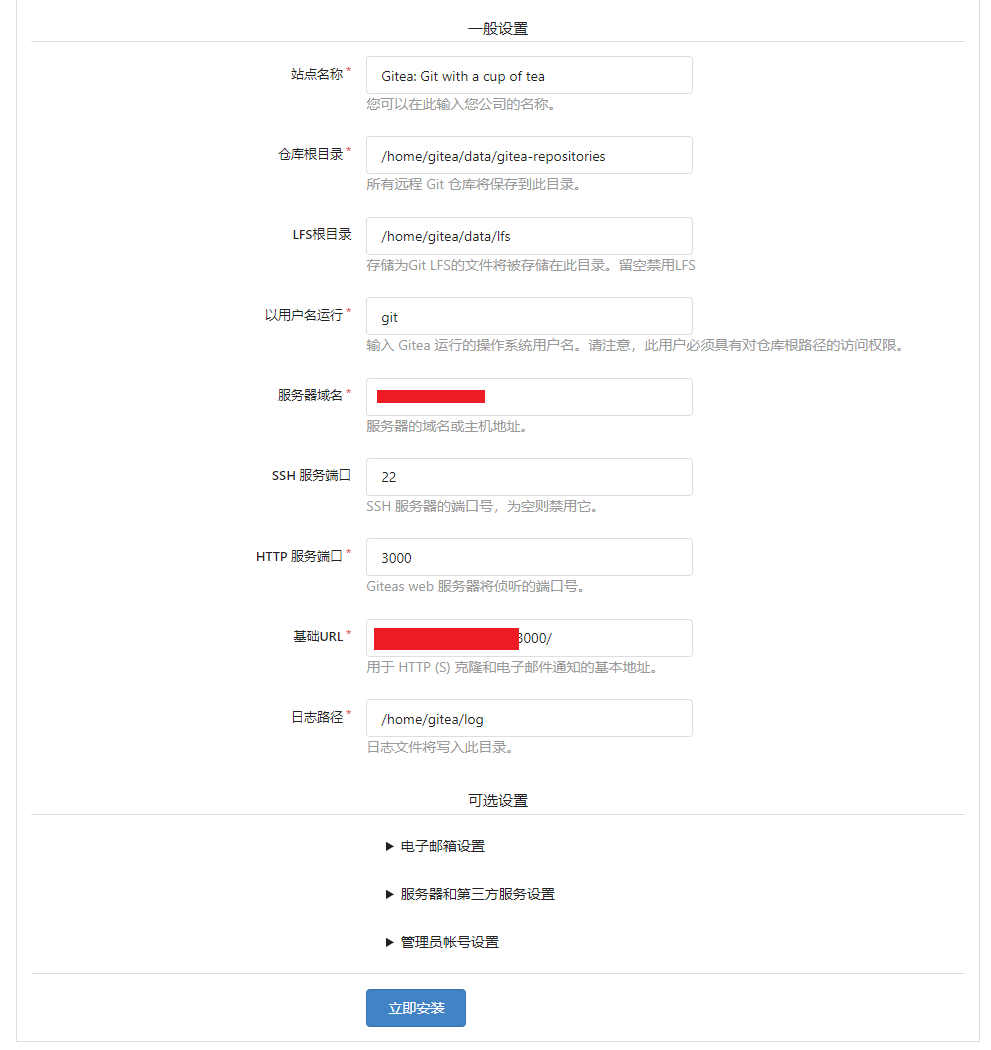
若是无法访问,启动失败,记得创建以上(和配置页面中)所用到的文件夹并且打开权限
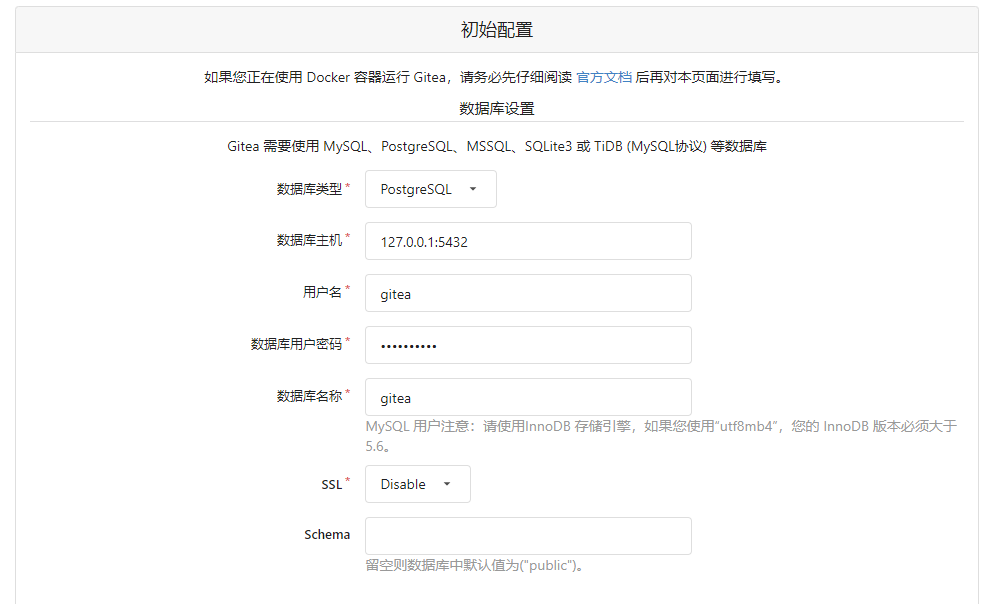
# 配置
默认端口是 3000
访问网址 ip:3000,按照页面说明完成配置即可